What is WebP and How to Use WebP Images in WordPress?
Having a blazing-fast WordPress site that loads in a jiffy is everyone’s dream, and one of the proven ways to improve page load speed is by optimizing images. Since images account for over half of an average web page’s weight, anything you do with your images not only ensures your pages are served faster but also saves a lot of space on your web server.
When using images on your WordPress site, choosing the right image file format for your images is as important as optimizing your images to load faster. Although there are many image file formats available to use, most websites rely on these four formats:
- JPEGs: Perfect for displaying highly-detailed images with a large variety of colors, like high-resolution Photographs. These images are often very large in file size but don’t offer the same quality under compression.
- PNGs: Ideal for images that don’t involve a lot of data, like screenshots, logos, banners, etc. These images support transparency and are excellent at retaining quality when compressed.
- GIFs: Excellent for animations, but not suitable to use as static images.
- SVGs: Best for logos, icons, and other similar vector illustrations you want to use on your site. Supports both animation and transparency!
All these standard image file formats have their own unique pros and cons, which you can understand through the following graphic:
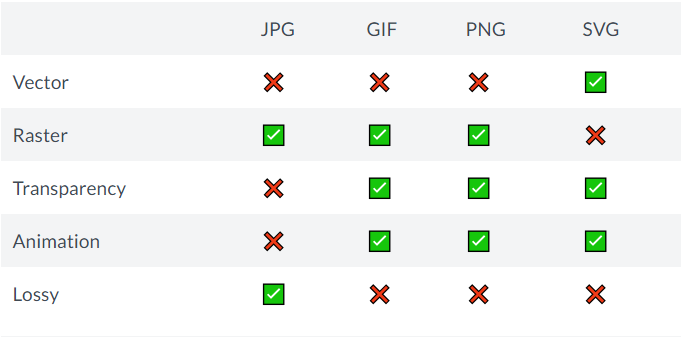
Image Credit: WPSpeedMatters.com
However, if you have ever analyzed your site via Google PageSpeed Insights, you might have noticed that it recommends you to “serve images in next-gen formats.”
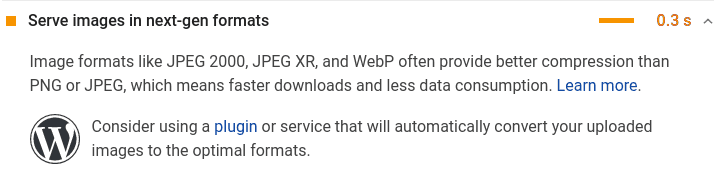
Image Credit: Google PageSpeed Insights
To begin, let’s have a quick overview of next-generation image formats:
- JPEG XR: A still-image compression standard and file format for enhanced HDR images. JPEG-XR has better compression efficiency than the original JPEG.
- JPEG 2000: The newest iteration of the JPEG file format, which uses lossless compression with least sacrifice to visual quality.
- WebP: A relatively new image format that supports superior lossy and lossless compression with good compression and image quality. WebP is Google’s recommended image format for the Web.
Since WebP typically achieves 30% more compression than its counterparts, it’s the most popular and preferred type of next-gen image. This guide discusses what WebP exactly is and how you can start using this image format on your WordPress site.
Highlights:
- What is WebP?
- Why Should You Use WebP Images?
- Which Browsers Do Support WebP Images?
- What Happens to WebP Images in Incompatible Browsers?
- What Are the Different Ways to Serve WebP Images?
- How to Use WebP Images in WordPress?
- How to Check If WebP Images Are Being Served?
What is WebP?
Created by the web performance team over at Google in the year 2010, WebP is a relatively new and modern image format that uses only the best lossless and lossy image compression methods to create a smaller file size without compromising the quality of the original image. With this extremely lightweight image format, webmasters and web developers create smaller, richer images that use less bandwidth and make websites load faster.
WebP images are incredibly versatile, allowing you to leverage the capabilities of JPEGs, PNGs, and GIFs in a single file format. To be more specific, WebP supports the following:
- Animation
- Lossy compression
- Lossless compression
- Alpha channel transparency
And this is actually what makes WebP the most lightweight option for anything from ultra HD pictures to animated logos. Just by converting JPEGs, PNGs, and GIFs into one convenient format that utilizes the file extension .webp, you can reap the performance benefits for your WordPress site.
Why Should You Use WebP Images?
According to Google’s WebP data, WebP images are on average:
- 25-34% smaller than comparable JPEG images
- 26% smaller in size compared to PNGs
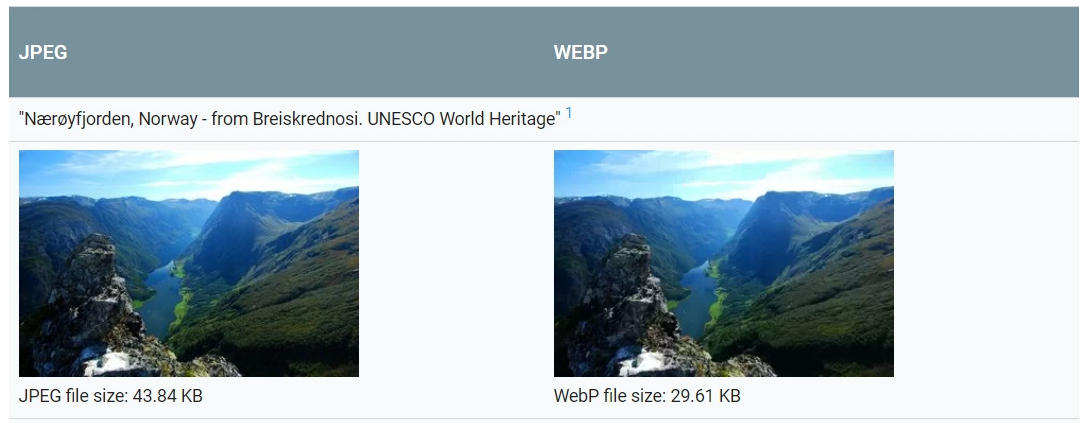
Image Credit: Developers.Google.Com
As a general rule, the smaller the file size of a web page is, the faster it will load. Since images significantly affect the loading time of a web page, using smaller images is strongly recommended. Thanks to small file size WebP offers, not only it makes your website faster, but also it simplifies the process of image optimization for you. Additionally, you also reap the following benefits:
- Faster load times improve User Experience (UX) for your site visitors.
- Faster load times and excellent user experience helps your website rank higher in search results.
- Small file size consumes less disk space and less bandwidth. Consequently, you save money on your hosting expenses while your visitors have to spend less data accessing your website.
In a nutshell, if you care about organic traffic and want to deliver your users pleasant and faster browsing experience, then you should consider using WebP images.
Which Browsers Do Support WebP Images?
You might be wondering, if WebP offers so many benefits, why are many websites still using JPEGs and PNGs?
Well, just like every light has its shadow, Not all modern browsers support WebP images yet. According to Can I Use…, WebP is currently supported in Microsoft Edge, Mozilla Firefox, Google Chrome, Opera, Opera Mini, Opera Mobile, the Android browser, Chrome for Android, Firefox for Android, UC Browser for Android, Samsung Internet Browser, QQ Browser, and Baidu Browser.
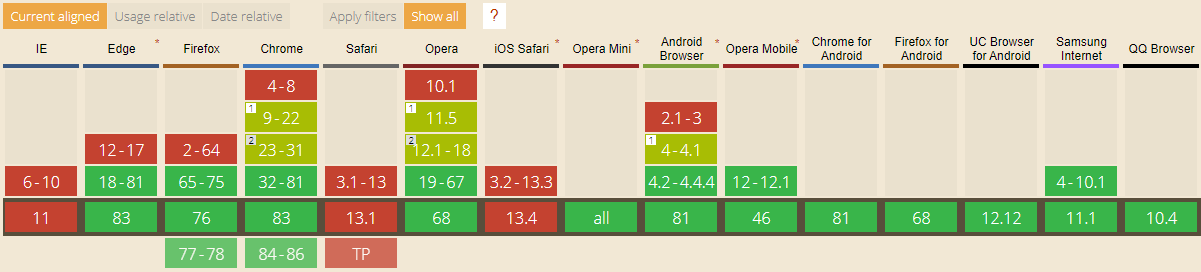
Image Credit: CanIUse.com
As you can see, these are just Safari, KaiOS Browser, and Internet Explorer lagging without any compatibility.
So, What Happens to WebP Images in Incompatible Browsers?
Fortunately, you’ll not lose anything by using WebP images on your WordPress site since you can always use PNG and/or JPEG images as a fallback for browsers that don’t support WebP images. This means that incompatible browsers won’t render a broken image; they will render your website with the JPEGs and PNGs instead. Thus, every visitor will be able to access your site.
Though this may require a bit more effort, but can be worth it for drastically improving your WordPress site’s performance. Think of WebP image format as an addition to your site as it only ensures that the visitors using supported browsers will be enjoying a faster website.
What Are the Different Ways to Serve WebP Images?
There are mainly two ways to serve WebP images:
#Using < picture > Tag
You can use the
< picture >
< source srcset=”img.webp” type=”image/webp” >
< img src=”img.png” alt=” ” >
< /picture >
#Through Varied Response
In varied response, you have a single image URL that is capable of delivering both WebP and non-WebP images according to the browser.
< img src=”img.jpg” / >
Even though the file extension is JPG, its response will be WebP in the supported browser.
The web server handles the entire process. However, you’d also have to pick the right CDN that supports WebP as a cache key. Otherwise, WebP images will be delivered to browsers that don’t support WebP. Also, there are chances that non-WebP images will be rendered in supported browsers.
How to Use WebP Images in WordPress?
There are several ways to implement WebP images in WordPress:
#On-the-fly WebP Conversion
This is probably the easiest way to serve WebP images on a WordPress site. All you need to opt for a Content Delivery Network (CDN) that supports converting standard image formats to WebP on the fly, along with image optimization. Here are some of the best contenders:
- BunnyCDN with Bunny Optimizer
- Cloudflare with Polish
- Cloudinary with the new ‘f_auto‘ feature
- ShortPixel Adaptive Images that uses StackPath CDN
- WP Compress
An added advantage of using this method is that you can also save on some disk space as you’re not required to store converted WebP images.
#Through Varied Response with CDN
As mentioned above, you can take advantage of the ‘Varied Response’ technique to serve both normal and WebP images on your WordPress site. However, for this method to properly work, you have to choose a CDN supporting WebP request headers as a cache key. Some CDN providers that support ‘Varied response‘ and WebP as a cache key are:
Whatever CDN you’re using, just make sure you enable the Cache Key WebP in their respective settings.
To set up the varied response for WebP in WordPress, you can use the WebP Express plugin. Once you install and activate the plugin, set the operation mode to ‘Varied Image responses’ and click ‘Save settings and force new .htaccess rules.’
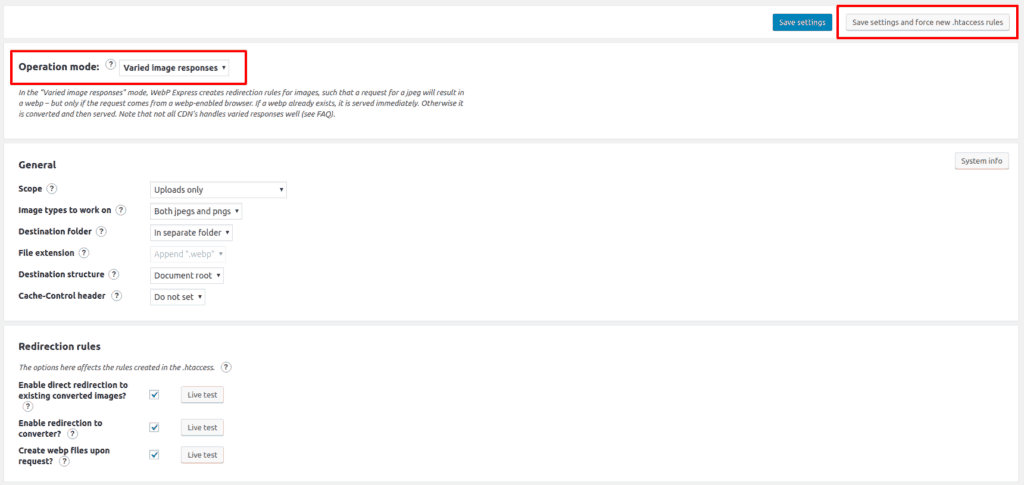
Image Credit: WordPress.Org
This will instruct the plugin to convert images to WebP on the fly. However, if the browser doesn’t support WebP, WebP Express will render default images.
Unfortunately, WebP Express only works in Apache, LiteSpeed, and OpenLiteSpeed servers. If you’re on NGINX or OpenResty, follow these instructions.
#Using Plugins
As usual, WordPress also offers several plugins to help you serve WebP images on your WordPress site:
1: WebP Express is a free plugin that uses the WebP Convert Library to convert all images on your WordPress site to the WebP format. It also leaves the original formats of images on your website so users on unsupported browsers can access them. After installation, the plugin asks you to start converting your images.
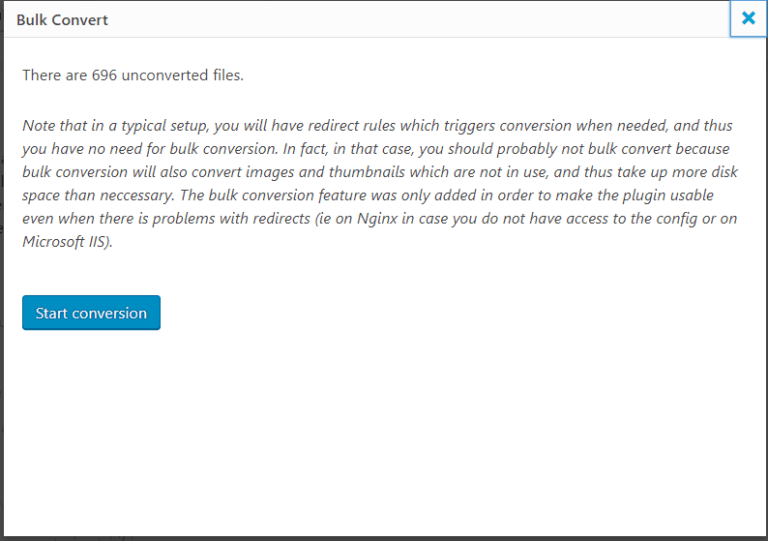
Image Credit: WordPress.org
Once the conversion is completed, you can go ahead with either Varied Response method described above or switch to CDN friendly mode to set up picture tag for WebP:
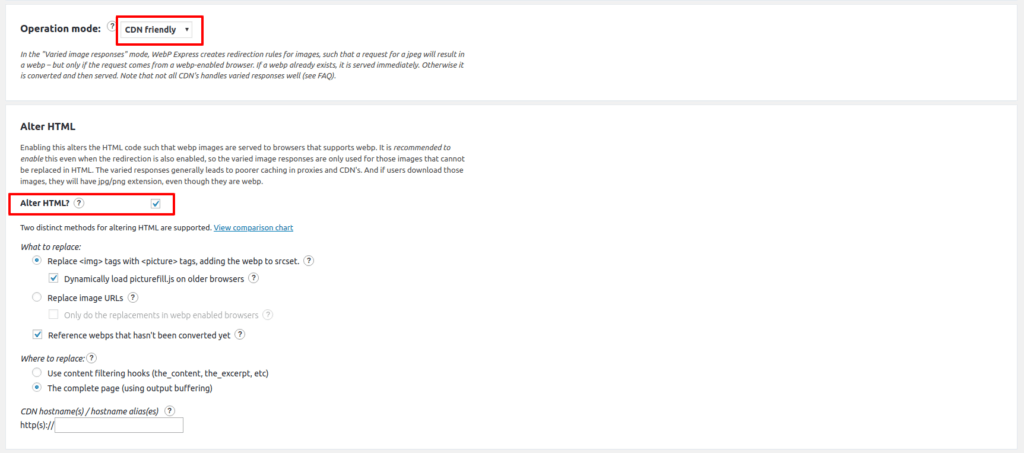
Image Credit: WordPress.org
Alternatively, if you’re not using any CDN, you can stick to Standard Mode to serve autogenerated WebP images.
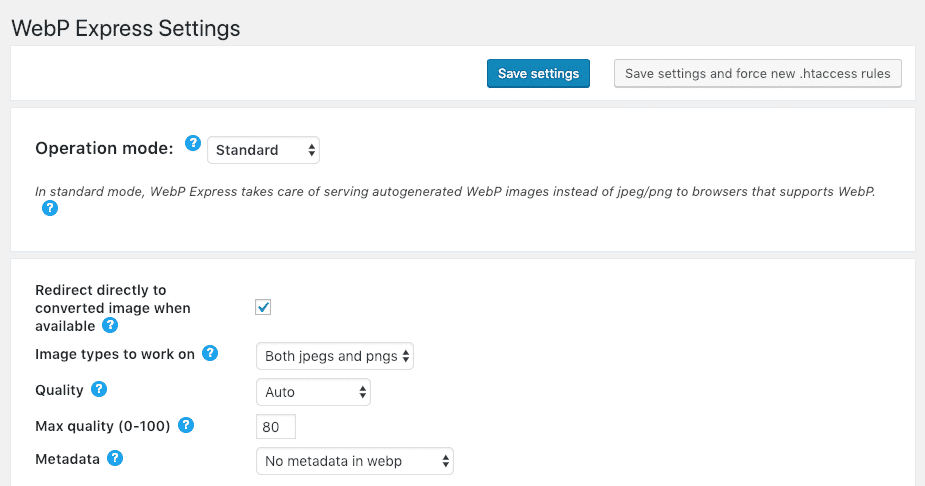
Image Credit: WordPress.org
This is arguably the best free plugin that does everything in a few clicks!
2: Optimole is another free option to automatically convert all your images to WebP format and serve them to supported browsers through Amazon CloudFront CDN. If the browser doesn’t support WebP, the plugin serves the images in their original formats. With Optimole, you’ll not have to do anything as the plugin does all the leg work for you.
3: Jetpack’s Site Accelerator (Formerly Photon) also allows you to serve JPEGs and PNGs in WebP format on compatible browsers. All you need to install and activate the plugin and toggle on ‘Enable site accelerator’ in the performance and speed section of Jetpack Settings.
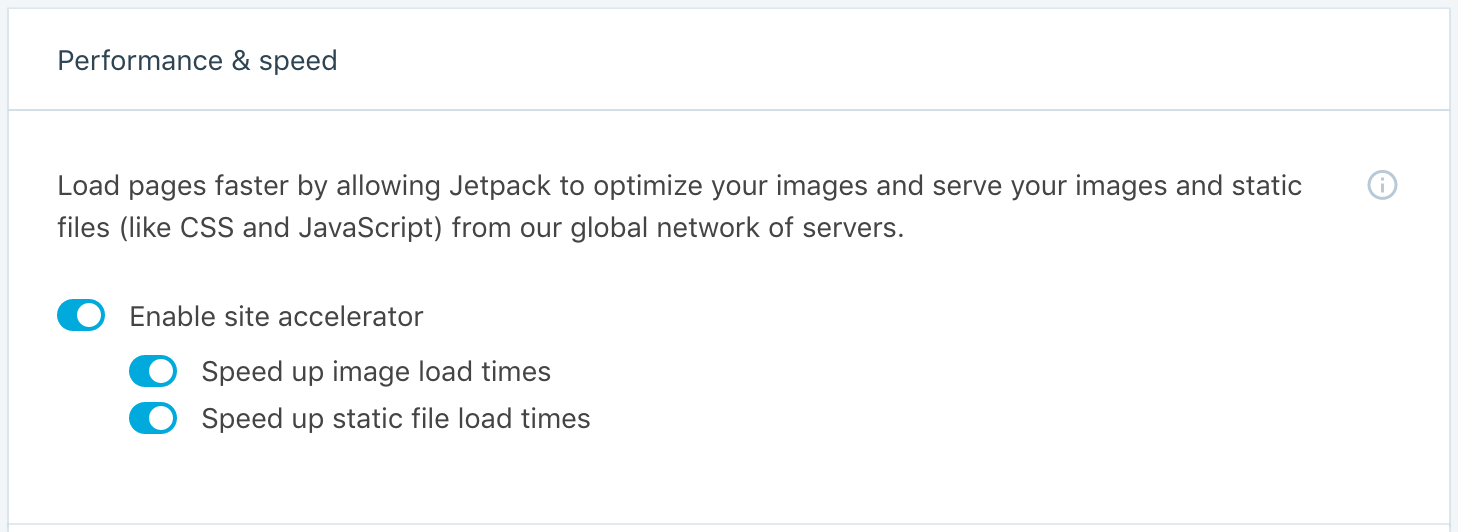
Image Credit: Jetpack.com
The plugin will then start serving images in the .webp image format on compatible browsers. However, be mindful that this method works only for sites hosted on WordPress.com and Jetpack-connected WordPress sites.
4: Imagify is a relatively new WordPress plugin with support for WebP images. The plugin allows you to serve WebP images in two ways:
- < picture > tag
- rewrite rules in the .htaccess file
However, to ensure everything will be displayed correctly on the front-end, it’s recommended you go with the second option because using < picture > tags might break your theme and plugins.
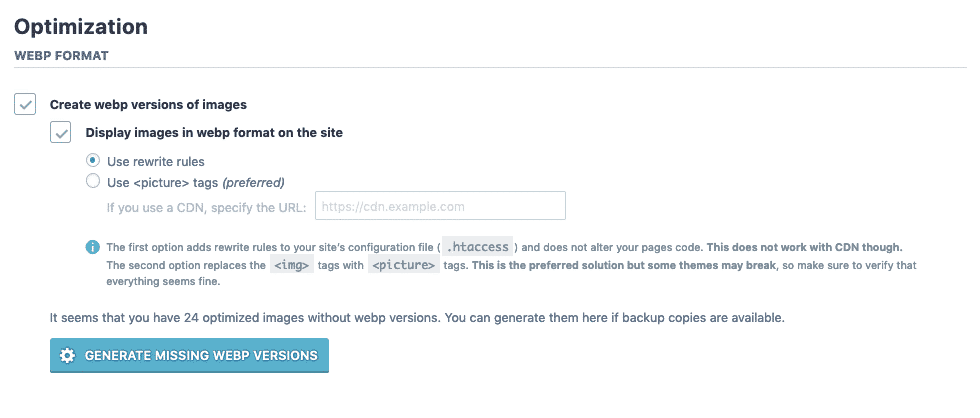
Image Credit: Imagify.io
5: Smush Pro is an all-in-one solution to convert your images to WebP versions and serve them up to compatible browsers through its CDN. With Smush Pro, you can start serving WebP images in just two simple steps:
Click the Get Started button in the CDN section.
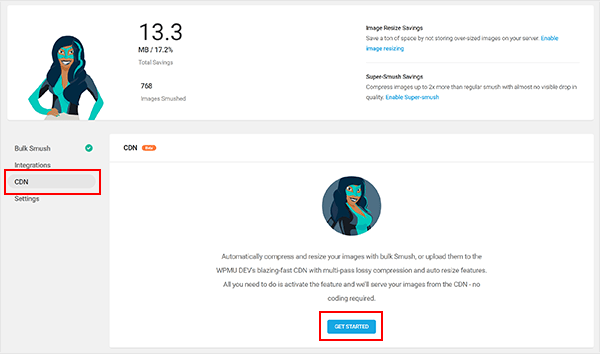
Image Credit: WPMUDEV.org
Toggle on Enable WebP conversion in the CDN settings.

Image Credit: WPMUDEV.org
That’s it! Luckily, you can try out Smush Pro free for 7-days!
6: WebP Converter for Media is another handy option to serve WebP images on your WordPress site. One of the best things about this plugin is that it does not change image URLs. Consequently, you always have one URL to an image file, regardless of whether or not the browser supports WebP. Also, the names of images don’t contain the WebP extension.
Image Credit: WordPress.org
Finally, you can also serve WebP images by combining Optimus HQ / ShortPixel Image Optimizer / EWWW Image Optimizer with Cache Enabler.
All of these plugins automatically convert your existing images into WebP format. Then, you can serve those files up to a supported browser using the Cache Enabler plugin.
After installing Cache Enabler, go to Settings >> Cache Enabler and check the box next to “Create an additional cached version for WebP image support.”
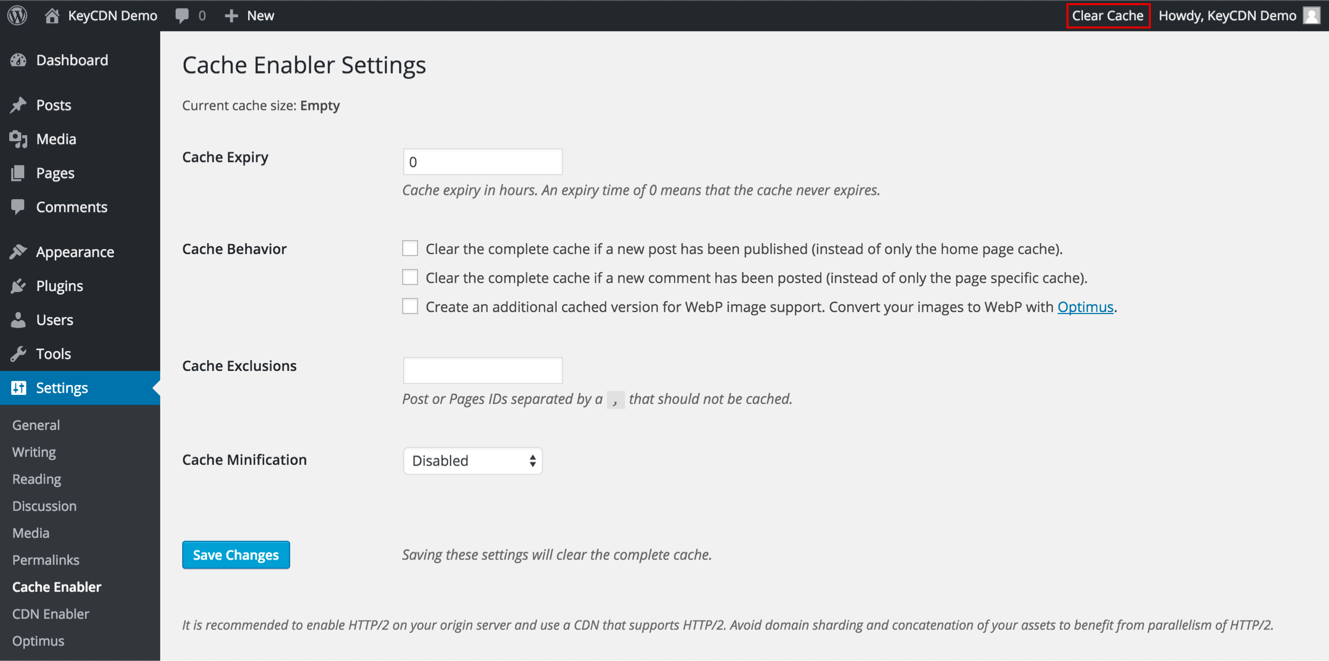
Image Credit: WordPress.org
#Manual WebP Configuration
If you don’t want to use any of the above-suggested methods or plugins, you can manually configure your WordPress site to serve WebP images using these steps:
-
- Convert Images to WebP: First thing first, you must convert all your images to WebP format. Use these tools for conversion:
And if you’re using Photoshop, you can use this plugin to export new files in WebP format.
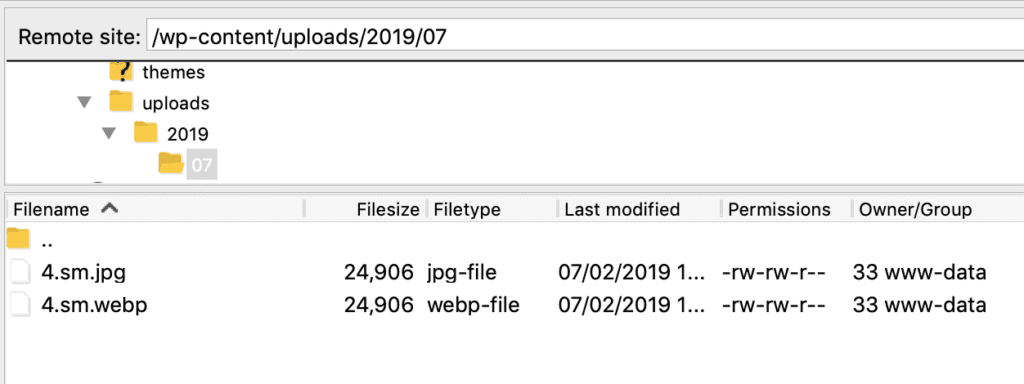
- Upload Two Versions of Each Image to the Same Directory: Now upload both the original and converted files to the same directory on your web server. Make sure the newly converted files are uploaded to the same location as the location that the original files are located at.
- Convert Images to WebP: First thing first, you must convert all your images to WebP format. Use these tools for conversion:
- Add WebP Format in HTML Document:Then edit the raw HTML code to use the
tag. Here you have to create path to your newly converted WebP file, just like this example code:
< picture >
< source srcset=”/path/to/image.webp” type=”image/webp” >
< img src=”/path/to/image.jpg” alt=”” >
< /picture >You need to do the same for each image you have on your WordPress site.
- Configure Server Settings: Configure your web server settings via .htacccess so that both browsers and your web server treat WebP images properly like other image formats. Add the following piece of code to your .htacccess file:
# Serve Images with correct Mime Type
AddType image/webp .webp# Setup Cache
ExpiresActive On
ExpiresByType image/webp A2592000
That’s It! - One More Thing: Since WordPress natively does not support uploading of WebP images for security reasons, you may get the following error:
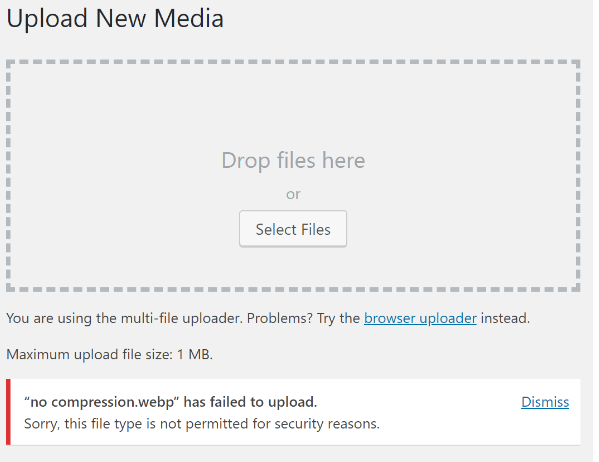
Image Credit: WordPress.org
Fix this issue by adding the following code to your theme’s functions.php file, especially if you’re uploading images directly from the WordPress media library.
function webp_upload_mimes( $existing_mimes ) {
// add webp to the list of mime types
$existing_mimes[‘webp’] = ‘image/webp’;// return the array back to the function with our added mime type
return $existing_mimes;
}
add_filter( ‘mime_types’, ‘webp_upload_mimes’ );
Since the manual method requires a lot of time and technical knowledge, it’s highly recommended you hire professional WordPress developers to carry out the manual WebP configuration.
How to Check If WebP Images Are Being Served?
There are a couple of ways to check if WebP images are being served on your WordPress site:
- Test your site against PageSpeed Insights or Pingdom, which reflects WebP image support.
- Clear all cache and load your site in Google Chrome. Press Ctrl + Shift + I to access Developer Tools.
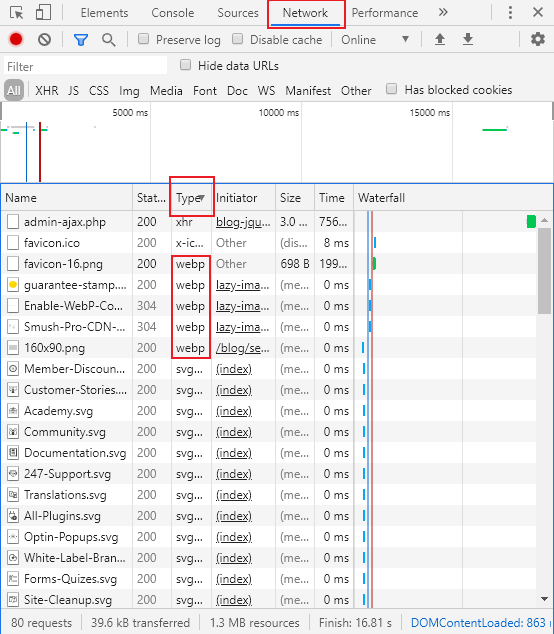
Then, click the Network tab, load your website again, and the Developer Tools will show you all the assets loaded. Now look for WebP images under Type tab.
That’s all about using WebP images in WordPress. If you face any problem implementing WebP format on your WordPress site, feel free to seek help from our WordPress development experts.